Купить/продать токены
С подробной инструкцией «как пополнить ваш кошелек и купить токены» можно ознакомиться в памятке.
Cтоимость одного Токена AVANGARD_(USD_101) равна 20 USD.sc (Stable Coin), что эквивалентно 20 USD по курсу НБРБ. После совершения покупки Вам будет отправлено соответствующее уведомление.
Если сумма инвестиций составит более 10 000 USD, у вас могут запросить перечень документов подтверждающий источники дохода.
Информацию о новых, размещаемых планируемых, и торгуемых выпусках облигационных займов и Токенов компании и можно получить на сайте компании — см. таблицу «Облигации ЗАО АВАНГАРД ЛИЗИНГ» и «Токены ЗАО АВАНГАРД ЛИЗИНГ», или подписавшись на telegram-канал или получать электронную рассылку, отправив электронное сообщение с контактной информацией на invest@avangard.by
# Как обменивать токены
Любой токен, выпущенный на блокчейне Waves, можно обменять на другой токен на децентрализованной бирже. Отправляя ордер (заявку на обмен), вы не передаете токены на биржу — они остаются на вашем аккаунте до момента, когда матчер (движок биржи) выполнит заявку и создаст транзакцию обмена. Блокчейн гарантирует, что условия обмена будут не хуже, чем указаны в заявке. Подробнее см. в разделе Ордер.
Пример децентрализованной биржи — приложение WX Network
, разработанное сторонней командой из сообщества.
# Создание ордера
# С помощью WX Network
Используйте online/desktop- или мобильное приложение. См. разделы Торговля на бирже (online/desktop-приложение)
документации WX Network.
# С помощью CCXT
CCXT (CryptoCurrency eXchange Trading) — JavaScript/Python/PHP-библиотека для торговли криптовалютами и получения рыночных данных. Она поддерживает более 100 бирж, в том числе WX Network.
Обмен с помощью CCXT доступен только для рекомендованных пар токенов
. Чтобы обменивать любые пары токенов, используйте другие клиентские библиотеки — см. примеры ниже.
Подробная информация приведена в разделе CCXT для WX Network
документации WX Network.
# С помощью JavaScript
# Установка параметров матчера
Используйте следующий адрес матчера:
Чтобы получить публичный ключ матчера, используйте метод GET /matcher API матчера.
# Установка ассетной пары
Ассетную пару образуют два ассета, которые вы хотите обменять: amount-ассет и price-ассет. Который из двух ассетов является price-ассетом, не зависит от того, какой ассет вы отдаете и какой получаете.
Вы можете посмотреть ассетные пары и идентификаторы ассетов в WX Network для Mainnet
на странице Торговля. Первый ассет в паре — это amount-ассет, второй — price-ассет.
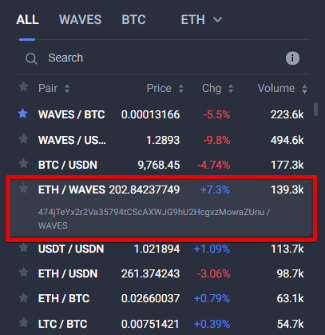
Вы также можете получить ассетные пары с помощью метода GET /matcher/orderbook или GET /matcher/settings . Подробнее см. раздел Matcher API
документации WX Network.
Идентификаторы ассетов отличаются на Mainnet и на Testnet.
WAVES — главный токен блокчейна Waves — не имеет идентификатора, в качестве ID нужно указывать значение ‘WAVES’.
# Заполнение параметров ордера, подписание и отправка на матчер
Используйте функции библиотеки waves-transactions :
- Функция order создает ордер и генерирует подпись. Для генерации подписи используется секретная фраза (seed) аккаунта.
- Функция submitOrder отправляет подписанный ордер на матчер.
Описание функций приведено в документации библиотеки
Комиссию матчера для ордера можно рассчитать с помощью метода POST /matcher/orderbook///calculateFee API матчера. В зависимости от пары ассетов, комиссия может быть фиксированной или процентной. Подробнее в разделе Комиссия матчера
документации WX Network.
import order, submitOrder > from '@waves/waves-transactions'; import fetch from 'node-fetch'; const seed = 'insert your seed here'; const matcherUrl = 'https://matcher-testnet.wx.network'; // Для Mainnet укажите 'https://matcher.wx.network' const matcherPublicKey = '8QUAqtTckM5B8gvcuP7mMswat9SjKUuafJMusEoSn1Gy'; // Для Mainnet укажите '9cpfKN9suPNvfeUNphzxXMjcnn974eme8ZhWUjaktzU5' const amountAssetId = 'WAVES'; const priceAssetId = '25FEqEjRkqK6yCkiT7Lz6SAYz7gUFCtxfCChnrVFD5AT'; // XTN на Testnet // Для Mainnet укажите 'DG2xFkPdDwKUoBkzGAhQtLpSGzfXLiCYPEzeKH2Ad24p' // Фактическое количество amount-ассета нужно умножить на 10^amountAssetDecimals const amount = 100000000; // 1 WAVES // Цену, выраженную в price-ассете, нужно умножить на 10^(8 + priceAssetDecimals – amountAssetDecimals) const price = 9500000; // 9,5 XTN за один WAVES // Получаем комиссию, рассчитанную на основе параметров ордера let response = await fetch(matcherUrl + '/matcher/orderbook/' + amountAssetId + '/' + priceAssetId + '/calculateFee', method: 'POST', headers: 'Accept': 'application/json', 'Content-Type': 'application/json' >, body: JSON.stringify( orderType: 'buy', amount: amount, price: price >) >); if (!response.ok) console.log("Не удалось рассчитать комиссию"); let fee = await response.json(); let orderParams = amount: amount, price: price, amountAsset: amountAssetId, priceAsset: priceAssetId, matcherPublicKey: matcherPublicKey, orderType: 'buy', version: 3, matcherFee: fee.base.matcherFee, matcherFeeAssetId: fee.base.feeAssetId > const signedOrder = order(orderParams, seed); await submitOrder(signedOrder, matcherUrl); let orderId = signedOrder.id; console.log('ID ордера: '+ orderId); # С помощью Python
Комиссию матчера для ордера можно рассчитать с помощью метода POST /matcher/orderbook///calculateFee API матчера. В зависимости от пары ассетов, комиссия может быть фиксированной или процентной. Подробнее в разделе Комиссия матчера
документации WX Network.
import pywaves as pw import requests pw.setNode('https://nodes-testnet.wavesnodes.com', chain = 'testnet') # Для Mainnet: pw.setNode() pw.setMatcher('https://matcher-testnet.wx.network') # Для Mainnet: pw.setMatcher() waves = 'WAVES' xtn = '25FEqEjRkqK6yCkiT7Lz6SAYz7gUFCtxfCChnrVFD5AT' # XTN на Testnet # Для Mainnet укажите 'DG2xFkPdDwKUoBkzGAhQtLpSGzfXLiCYPEzeKH2Ad24p' asset_pair = pw.AssetPair(pw.Asset(waves), pw.Asset(xtn)) # Фактическое количество amount-ассета нужно умножить на 10^amountAssetDecimals amount = 100_000_000 # 1 WAVES price = 9.5 # 9,5 XTN за один WAVES # Цену, выраженную в price-ассете, нужно умножить на 10^(8 + priceAssetDecimals – amountAssetDecimals) norm_price = 9_500_000 # Получаем комиссию, рассчитанную на основе параметров ордера matcher_fee = requests.post(f'pw.MATCHER>/matcher/orderbook/waves>/xtn>/calculateFee', headers = 'Accept': 'application/json' >, json = 'orderType': 'buy', 'amount': amount, 'price': norm_price > ).json()['base']['matcherFee'] my_address = pw.Address(seed = 'insert your seed here') buy_order = my_address.buy(asset_pair, amount = amount, price = price, matcherFee = matcher_fee, matcherFeeAssetId = xtn) print(f'Buy order ID: buy_order.orderId>') # Проверка статуса ордера
# С помощью WX Network
Размещенный ордер отображается на вкладке Мои открытые ордера в online/desktop-приложении или на вкладке Мои ордера в мобильном приложении. См. разделы Торговля на бирже (online/desktop-приложение)
документации WX Network.
# С помощью API матчера
Чтобы получить статус ордера, достаточно знать его идентификатор и ассетную пару. Используйте метод GET /matcher/orderbook/// . Получение статуса доступно для ордеров, размещенный не более 30 дней назад. Для частично выполненных ордеров метод также возвращает сумму выполненной части.
Описание метода приведено в разделе Matcher API
документации WX Network.
Пример запроса:
curl 'https://matcher-testnet.wx.network/matcher/orderbook/WAVES/3KFXBGGLCjA5Z2DuW4Dq9fDDrHjJJP1ZEkaoajSzuKsC/9kRXfmrhWhsGBohygMoo91RgcnmJUB37K4rQQN4rEidT' Приведенный пример подходит для утилиты cURL . Вы можете адаптировать запрос для своего языка программирования.
# С помощью JavaScript
const matcherUrl = 'https://matcher-testnet.wx.network'; const amountAssetId = 'WAVES'; const priceAssetId = '25FEqEjRkqK6yCkiT7Lz6SAYz7gUFCtxfCChnrVFD5AT'; // XTN на Testnet // Для Mainnet укажите 'DG2xFkPdDwKUoBkzGAhQtLpSGzfXLiCYPEzeKH2Ad24p' const orderId = '9kRXfmrhWhsGBohygMoo91RgcnmJUB37K4rQQN4rEidT'; let response = await fetch(matcherUrl + '/matcher/orderbook/' + amountAsset + '/' + priceAsset + '/' + orderId); let json = await response.json(); console.log('Статус ордера: ' + json.status); # С помощью Python
# Используем ордер из предыдущего примера print(buy_order.status()) # Отмена ордера
Вы можете отменить ордер, если он еще не выполнен полностью.
# С помощью WX Network
Вы можете отменить ордер:
- В online/desktop-приложении: нажмите Отмена на вкладке Мои открытые ордера.
- В мобильном приложении: Note: нажмите X на вкладке Мои ордера.
# С помощью JavaScript
Запрос на отмену ордера должен быть подписан отправителем ордера.
Используйте функции библиотеки waves-transactions :
- Функция cancelOrder создает и подписывает запрос на отмену ордера.
- Функция cancelSubmittedOrder отправляет подписанный запрос на матчер.
Пример:
import cancelOrder, cancelSubmittedOrder > from "@waves/waves-transactions"; const matcherUrl = 'https://matcher-testnet.wx.network'; const amountAssetId = 'WAVES'; const priceAssetId = '25FEqEjRkqK6yCkiT7Lz6SAYz7gUFCtxfCChnrVFD5AT'; // XTN на Testnet // Для Mainnet укажите 'DG2xFkPdDwKUoBkzGAhQtLpSGzfXLiCYPEzeKH2Ad24p' const seed = 'insert your seed here'; const orderId= '9kRXfmrhWhsGBohygMoo91RgcnmJUB37K4rQQN4rEidT'; const co = cancelOrder( orderId: orderId >, seed); const canceledOrder = await cancelSubmittedOrder(co, amountAsset, priceAsset, matcherUrl); console.log(canceledOrder.status); # С помощью Python
# Используем ордер из предыдущего примера buy_order.cancel() # Получение списка ордеров
# С помощью WX Network
Список ордеров можно посмотреть на вкладках Мои открытые ордера и Моя история ордеров в online/desktop-приложении или на вкладке Мои ордера в мобильном приложении. См. разделы Торговля на бирже (online/desktop-приложение)
документации WX Network.
# С помощью JavaScript
Для получения списка размещенных аккаунтом ордеров предназначен метод GET /matcher/orderbook/ . Описание метода приведено в разделе Matcher API
документации WX Network.
В заголовке запроса необходимо указать подпись массива байтов, состоящего из байтов публичного ключа аккаунта и байтов текущей временной метки. Для генерации подписи используется функция signBytes
и секретная фраза (seed) аккаунта.
import libs > from '@waves/waves-transactions'; const matcherUrl = 'https://matcher-testnet.wx.network'; const seed = 'insert your seed here'; const LONG, BASE58_STRING > = libs.marshall.serializePrimitives; const getOrdersApiSignature = (seed, senderPublicKey, timestamp) => const pBytes = BASE58_STRING(senderPublicKey); const timestampBytes = LONG(timestamp); const bytes = Uint8Array.from([ . Array.from(pBytes), . Array.from(timestampBytes), ]); return libs.crypto.signBytes(seed, bytes); >; const timestamp = Date.now(); const senderPublicKey = libs.crypto.publicKey(seed); const signature = getOrdersApiSignature(seed, senderPublicKey, timestamp); const url = `$matcherUrl>/matcher/orderbook/$senderPublicKey>`; // Добавьте ?activeOnly=true для получения только активных ордеров let response = await fetch(url, headers: "Timestamp": timestamp, "Signature": signature > >); let json = await response.json(); console.table(json); # С помощью Python
Получить список ордеров по заданной ассетной паре, отправленных аккаунтом, можно с помощью функции getOrderHistory библиотеки PyWaves
import pywaves as pw my_address = pw.Address(seed='insert your seed here') pw.setNode('https://nodes-testnet.wavesnodes.com', chain = 'testnet') # Для Mainnet: pw.setNode() pw.setMatcher('https://matcher-testnet.wx.network') # Для Mainnet: pw.setMatcher() waves = 'WAVES' xtn = '25FEqEjRkqK6yCkiT7Lz6SAYz7gUFCtxfCChnrVFD5AT' # XTN on Testnet # Для Mainnet укажите 'DG2xFkPdDwKUoBkzGAhQtLpSGzfXLiCYPEzeKH2Ad24p' asset_pair = pw.AssetPair(pw.Asset(waves), pw.Asset(xtn)) my_orders = my_address.getOrderHistory(asset_pair) Как продать токены
To attract funding and launch a crypto project, the team creates a proprietary token and conducts a token sale. One of the most popular ways to sell tokens has become Initial DEX Offering, as it allows you to easily list tokens on a decentralized exchange and immediately start trading after the token sale. In this article, you will learn how to prepare for a token sale, what steps you need to take to launch and conduct it, and what listing options there are on DEXes.
What Is IDO?
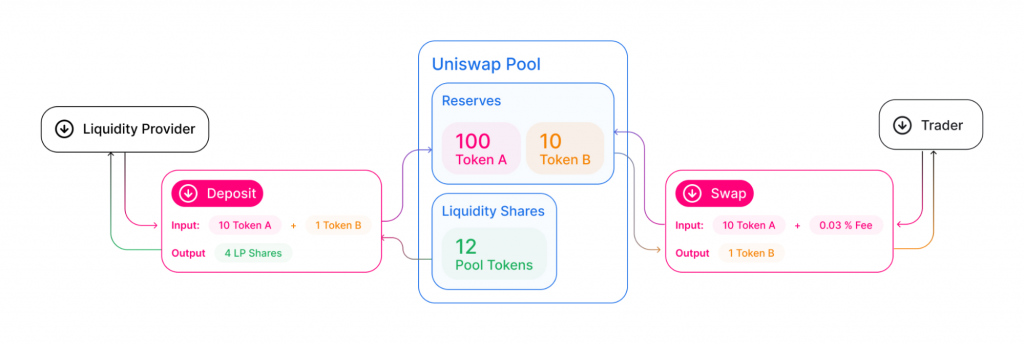
IDO or Initial DEX Offering is a token sale format similar to Initial Exchange Offering (IEO), except that it takes place on decentralized exchanges (DEXes), as the name implies, and not on centralized (CEXes). Thus, so-called «decentralized token sales» can be carried out without the participation of the exchange itself since any user can issue their token and sell it on a decentralized exchange without any restrictions. IDO and IEO became the next stage in the evolution of Initial Coin Offering (ICO) — the first format of token sales, which appeared back in 2013. However, ICOs had a lot of problems related to fraud. The sale of tokens in no way obliged the founders of the projects to issue tokens and fulfil their obligations to investors who were not legally protected in any way. As a result, after the token sale, many teams simply stopped working on the project, and investors were left with useless tokens in their hands, which they could not even sell. Besides loud promises, many ICO investors received nothing. The advantage of Initial DEX Offerings over ICOs is that the token sale takes place immediately on a decentralized exchange, which is also known as the AMM protocol. During the token sale, a liquidity pool is created, and users can trade them immediately after the IDO.
How to Launch IDO and Sell Tokens?
Launching IDO and selling tokens is a process that takes place in several stages. You can’t just take and sell your tokens to investors without preparation: most likely, you simply won’t be able to sell them even at a very low price if nothing is known about the project. Therefore, before you sell tokens, you need to prepare the ground and tell investors in detail for what purposes you are conducting a token sale.
Step 1. Creating a Project
- Why will investors want to buy your tokens?
- What is their value to the end user?
- How can token holders use your project’s cryptocurrency?
Investors are not interested in the tokens themselves: it is important for them to understand why the tokens of your project can grow in price. In other words, investors are concerned about what benefits your tokens will bring them and whether they will receive revenue from them.
Determine what problem your project solves and what benefits it will bring to users and investors. Will your project have its own blockchain? For example, if you are launching a marketplace for the sale of digital collections, you do not need your own blockchain: you can use any of the existing ones, such as Ethereum, BNB Chain, Solana, Cardano, Polkadot and so on.
But if you still decide to create your own blockchain, you will need a strong development team that can make a secure blockchain and reliably test it to avoid critical errors after launch.
An important point is a purpose of creating a token and conducting an IDO. Tokensale is necessary in order to attract financing to the project. Therefore, it is important to provide investors with the necessary information about what you are collecting these funds for and how you will use them for the development of the project.
Step 2: Development Strategy
So, you have created the idea and concept of the project. Perhaps you already have a prototype or at least a website. What’s next? The next step is to create a Whitepaper and a roadmap for the project.
Provide as much information about your project as possible — this will spur the interest of users and investors in it:
- What does your project do, and how is it unique?
- What makes it stand out from the competition, and what advantages does it have?
- How and for what will tokens be used in the project?
- How will the project develop, and what new features do you plan to add in the future?
At this stage, the point about the distribution of tokens will be no less important. As a rule, the maximum issue of tokens is determined in advance. Even before minting tokens, you need to determine how you will distribute tokens among the community and the team. Here is an example of token distribution:
- 15% — The team and advisors
- 10% — Marketing
- 5% — Airdrops
- 20% — Future events and strategic development/rewards for holders
- 15% — Private Sale
- 25% — Public Sale
We have only listed the main points that are often found in the Whitepapers of many projects, but the ratio of tokens may differ depending on the priorities of the team: some allocate more tokens for marketing and others for a token sale.
Finally, work out the roadmap in detail: determine how your project will develop for the next 2-3 years. Highlight the main stages of development. For example, when the launch of the MVP or mobile application will take place when the token is listed on major exchanges and on which DeFi platforms it can be used.
Step 3. Token Creation
Blockchain technologies are good because any user can create their own token, even without a deep knowledge of programming languages: you can use the source code blanks and only adjust it to deploy a simple, smart contract and issue your tokens.
However, if you are creating a full-fledged product with advanced functionality, you will need to develop a complex smart contract, which cannot be done without experience and knowledge. If there are no professional, smart contract developers in your team, you can use the Icoda services.
The smart contract determines what operations users will be able to perform with your tokens. For example, this can be swapped on a decentralized exchange, blocking tokens for obtaining crypto loans or paying for digital goods and services. The more useful functions your token has, the more attractive it will be for users and, as a result, for investors.
Step 4. Pre-marketing
Even before the start of the token sale, it is important to warm up the interest of the audience so that as many users as possible want to purchase your token. The higher the interest of investors in buying a future token, the more chances there are to successfully complete the IDO and raise the necessary amount to finance the project.
Whitepaper, roadmap and the project website are also part of the marketing campaign. But promotion on social networks is no less important, as they reflect the activity of the audience and its interest in the project. It is social networks, first of all, that investors often pay attention to. You can also launch an ambassador program and attract advisors and influencers based on your budget allocated for the project. For example, connect bloggers from Instagram and YouTube to the advertising that is suitable for the subject of your project.
It is very important to start promotion long before the IDO, and not right before it starts, and even more so not after the launch. You need to make sure that by the start of sales, you have a lot of people who want to purchase a token. The greater the hype, the more successful the Initial DEX Offering will be, which, in turn, will attract even more attention to the project.
Step 5. Token Listing on DEX
After the creation of the project and the elaboration of the concept, the creation of the token and its promotion, the final step remains — the IDO. To do this, you need to list the token on a decentralized exchange. This can be done in two ways: to list the token yourself, bypassing the listing procedure, or to do it through the launcher in compliance with all the conditions of the platform.
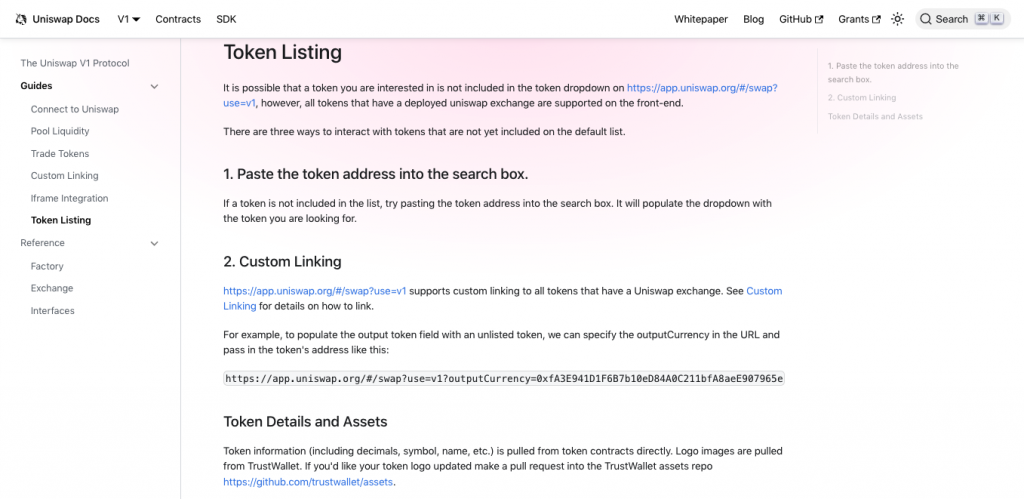
Adding a Token on Your Own
Any user can do this, but in this case, the exchange will not promote your IDO, and instead of a proprietary page, there will be a warning that the token was added by the user, and the exchange does not guarantee that the token was not placed by scammers.
Adding a Token via the DEX Panel
Each decentralized exchange places a project token as well as helps with IDO and token sale promotion. However, this is a paid service, the cost of which depends on the specific exchange. In addition, to place a token through the DEX launcher, you need to fulfil the conditions of the platform. The larger and more famous the exchange, the more expensive the listing cost and the stricter the conditions.
However, listing on popular DEXes will be a plus for the reputation of your project, as it will show users the seriousness of your intentions. Listing on little-known exchanges will cost much cheaper, but from the point of view of promotion, it will be worse, especially if you are conducting a major marketing campaign and have already attracted celebrities to promote IDO.
For listing via the exchange panel, the founders of the projects need to fill out a special form to contact the representatives of the exchange and agree on the terms of cooperation. Here is an example of an application form for conducting Initial Farm Offers (IFOs) on the PancakeSwap decentralized exchange:
Как продать монету/токен?
После того, как вы внесете монеты, которыми хотели бы торговать, в свой кошелек, нажмите на кнопку “торговать” в левом верхнем углу, что приведет вас к торговой панели ATAIX. На панели инструментов выберите пару, на которую вы хотели бы торговать, в левом верхнем углу. После того, как вы выбрали пару, выберите, хотите ли вы выставить “лимитный” или “рыночный” ордер.
Лимит
Для лимитного заказа обратите внимание на количество монеты, которую вы хотели бы приобрести. Отметьте сумму, которую вы готовы заплатить за нее монетой, которой вы торгуете, в поле ниже. Как только будет размещен ордер на продажу, соответствующий вашему запросу, сделка будет автоматически исполнена. Существует три типа лимитных ордеров, которые вы можете выбрать под полем цена:
- Good til Cancel (GTC) — ордер будет доступен до тех пор, пока он не будет выполнен или отменен.
- Fill or Kill (FTK) — ордер должен быть выполнен полностью и немедленно или быть отменен.
- Immediate or Cancel (IOC) — заказ должен быть выполнен немедленно или отменен, при этом возможно частичное выполнение.
Рынок
Для рыночного ордера просто укажите количество монеты, которую вы хотели бы приобрести, и нажмите “купить”. Заказ будет выполнен на основе рыночной стоимости монеты.
Все еще есть вопросы? Свяжитесь с нами
- Пользователю
- Удобные платежи
- FAQ
- Партнерская програма
- Поддержка
- О компании
- Правила и политики
- Условия пользования
- Политика конфиденциальности
- Предупреждение о рисках
- Правила использования cookie
- Лицензии


ATAIX Eurasia Ltd. уполномочена финансовым регулятором МФЦА, Astana Financial Services Authority (“AFSA”), на осуществление деятельности (-ей) по управлению Средством торговли цифровыми активами в тестовой среде FinTech Lab* (регуляторная песочница МФЦА) в соответствии с Лицензией # AFSA-G-LA-2022-0002 с датой истечения срока действия 06 апреля 2024 года. Статус лицензии и ее действительность можно проверить на веб-сайте AFSA (www.afsa.kz ).
+7(727) 356 11 70
[email protected] или
Офис ATAIX Eurasia, Астана, улица Кабанбай Батыра 21
Клиенты и физические лица, которые недовольны услугами или продуктами, предлагаемыми компанией «ATAIX Eurasia Ltd.» или ее сотрудниками, могут подать жалобу в Комитет по регулированию финансовых услуг Астаны («AFSA»), финансовый регулятор Международного финансового центра Астаны. Для подачи жалобы в AFSA обращайтесь:
+7(7172) 64 72 60
[email protected] или
Офис AFSA, Астана, Мангилик Ел, 55/17, павильон C3.2.
© 2023 ATAIX Eurasia Ltd. — Уполномоченная торговая организация МФЦА