[Скидка] Обзор Xeovo VPN. Для тех, кому важна приватность

Возможно, вы уже слышали о хостинге Xeovo, и даже пользовались их услугами. Теперь эта компания предоставляет услуги VPN. И в этой статье я решил подробнее рассмотреть Xeovo VPN.
Кто такие Xeovo
Как я написал выше, Xeovo были хостинг-компанией. Тем не менее, многие клиенты использовали ресурсы компании для поднятия приватных VPN, и ребята решили, что будет правильным переквалифицироваться. Так они сами стали VPN-провайдером.
Цель Xeovo — не дать интернет-провайдерам следить за вами, тем самым не допуская продажу и передачу ваших данных.
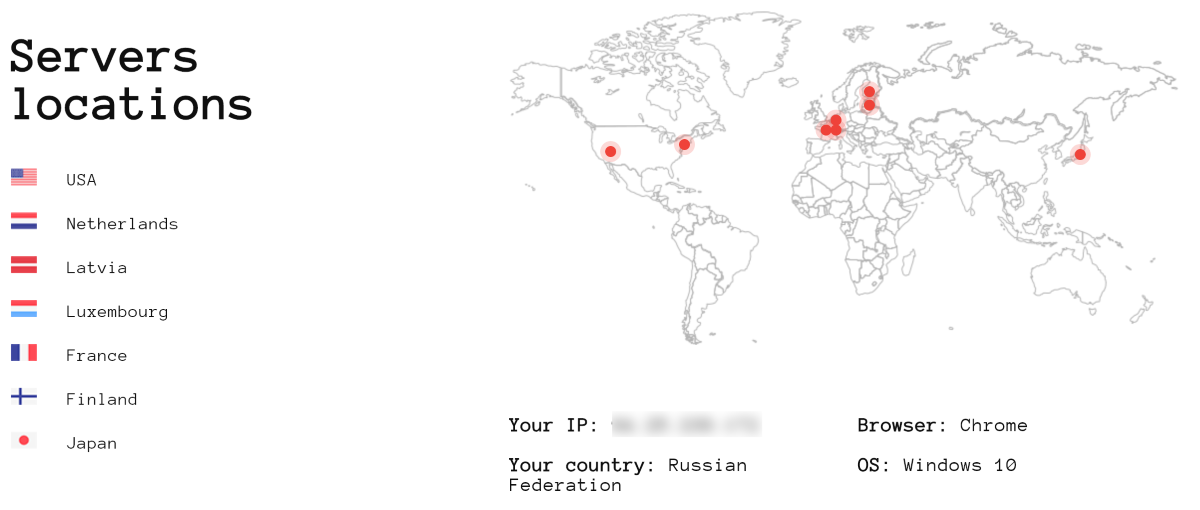
Разработчики Xeovo VPN не стараются завлечь пользователей хвалебными описаниями своего продукта. На главной странице вас ждёт просто краткое описание основных возможностей, список серверов и кнопка «Купить».

Всё потому,что Xeovo необычный VPN для пользователя, который хочет нажать одну кнопку, и получить результат. Этот VPN для тех, кто задумывается о надёжности услуги, своей анонимности или безопасности, и хочет взять всё под свой контроль.
Благодаря тому, что компания базируется в Финляндии, она не обязана вести логи. Также сервис использует шифрование ChaCha20 и AES-256, неограниченный трафик со скоростью до 1 Gbps и одновременную работу на пяти устройствах. На данный момент доступно 7 стран для подключения. В России серверов нет.
Настройка
У Xeovo нет своего собственного клиента. Вместо этого предлагается использовать официальный клиент WireGuard или OpenVPN. Если про OpenVPN многие слышали, то WireGuard может оказаться чем-то новым. Давайте разберёмся, что это такое и в чём разница между этими протоколами.
WireGuard — относительно новый протокол, датой появления которого можно назвать 2016 год. Именно тогда появился первый снэпшот кода. Новый протокол решает многие проблемы OpenVPN и IPsec.
К примеру, новичкам часто бывает трудно самим настроить подключение к OpenVPN. Иногда при подключении используются устаревшие типы шифрования. А сам код протокола насчитывает около 600 000 строчек кода, что затрудняет поиск бэкдоров и багов сообществом.
Настройка WireGuard происходит гораздо проще. Для криптографических пакетов сделано версионирование, что позволяет вовремя обновлять протоколы шифрования. Код состоит из примерно 4 000 строчек. Всё это влияет не только на общую безопасность такого соединения, но и на его скорость.
Xeovo поддерживает оба протокола. А они, в свою очередь, позволяют настроить VPN практически на любом устройстве с выходом в интернет.
Настройка Xeovo через OpenVPN
Разработчики на сайте предлагают инструкции для настройки на Windows, macOS, Linux, iOS и Android.
От вас требуется выбрать операционную систему, протокол UDP/TCP и сервер.
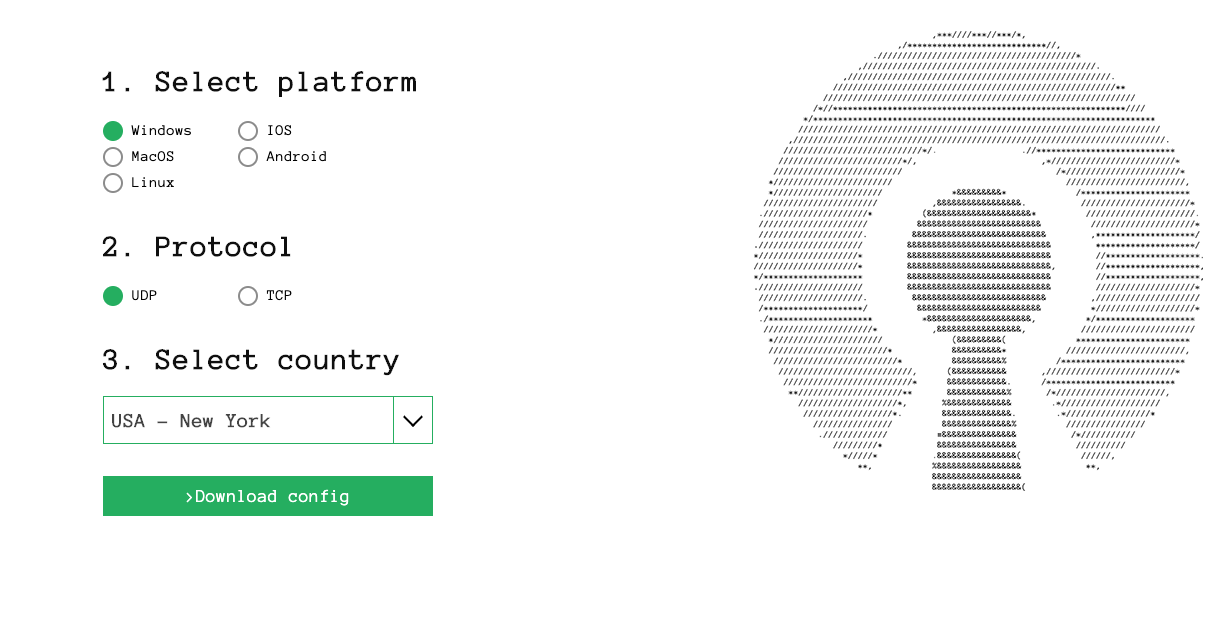
Установите клиент OpenVPN, скопируйте файл конфига в папку программы. Запустите OpenVPN, введите логин/пароль от сайта, и готово.

Если вы всё равно ничего не поняли, то вот более подробная инструкция и даже видео:

Настройка Xeovo через WireGuard
В случае с WireGuard процесс немного другой. Нужно выбрать страну, IPv4 и/или IPv6.
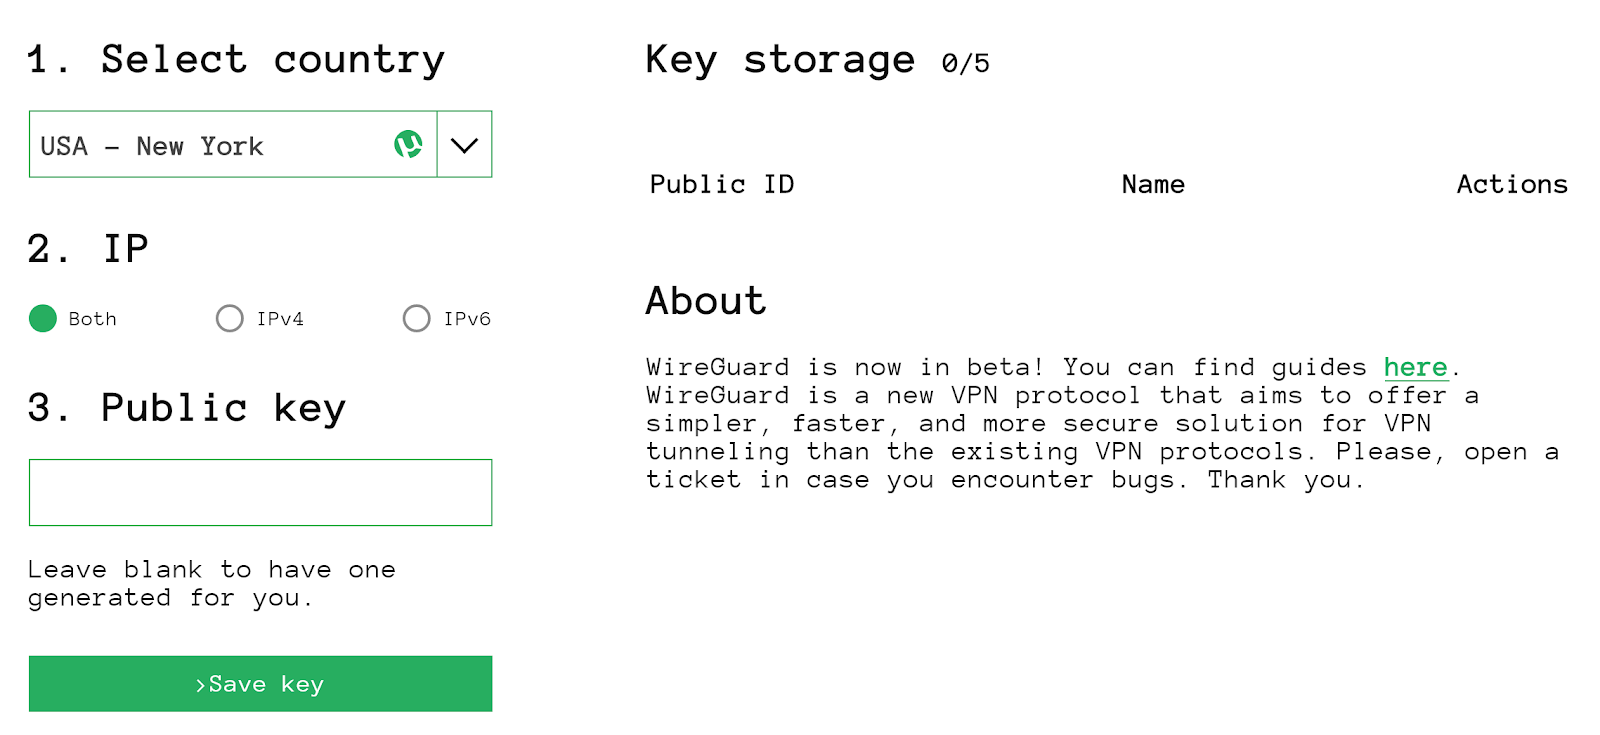
Поле Public Key не нужно заполнять. Нажимаете Save Key, и Xeovo генерирует ключ для WireGuard.
Ключ нужно добавить в клиент WireGuard. И нажать кнопку «Activate». Подключение завершено.

Цены
Стоимость Xeovo VPN начинается от $4,99 в месяц — при оплате одного месяца. При оплате за год получается $2,99. К оплате принимаются карты, PayPal и криптовалюта.

По коду themarfa можно получить скидку 10% при оплате. Пользуйтесь на здоровье.
На первый взгляд может показаться, что Xeovo VPN сделан для каких-то кулхацеров, и обычному пользователю никогда не запустить приложение. На самом деле вся настройка сводится к установке клиента под вашу операционную систему и «скармливанию» ему конфигурационного файла.
Я часто пользуюсь другими VPN-провайдерами и, честно говоря, ни разу не пользовался OpenVPN или WireGuard. Процесс — от авторизации на сайте до подключения в приложении — занял меньше пяти минут. И мне даже не понадобилась инструкция. Повторное подключение осуществляется уже нажатием одной кнопки.
Поэтому я не могу сказать, что Xeovo VPN сложнее конкурентов. С другой стороны, вы контролируете все необходимые параметры подключения и можете настроить VPN на любом устройстве.
Как оплатить VPN криптовалютой
С прошлого года пользователи VPN в России оказались перед дилеммой: западные VPN-сервисы больше не принимают российские карты, а российские VPN-сервисы бесполезны для тех, кто хочет без ограничений пользоваться запрещёнными социальными сетями или читать запрещённые сайты. Один из вариантов обхода этой проблемы стала оплата криптовалютой, в первую очередь — Биткоин.
В этой статье мы дадим максимально простую инструкцию оплаты криптовалютой для тех, кто пользуется рублями на примере оплаты VPN Xeovo.
Регистрация
Первый шаг — регистрация на xeovo.com для получения суммы и реквизитов платежа. После регистрации откроется панель управления. При отсутствии действующей подписки будет сообщение Subscription not found: Buy. Нам туда.
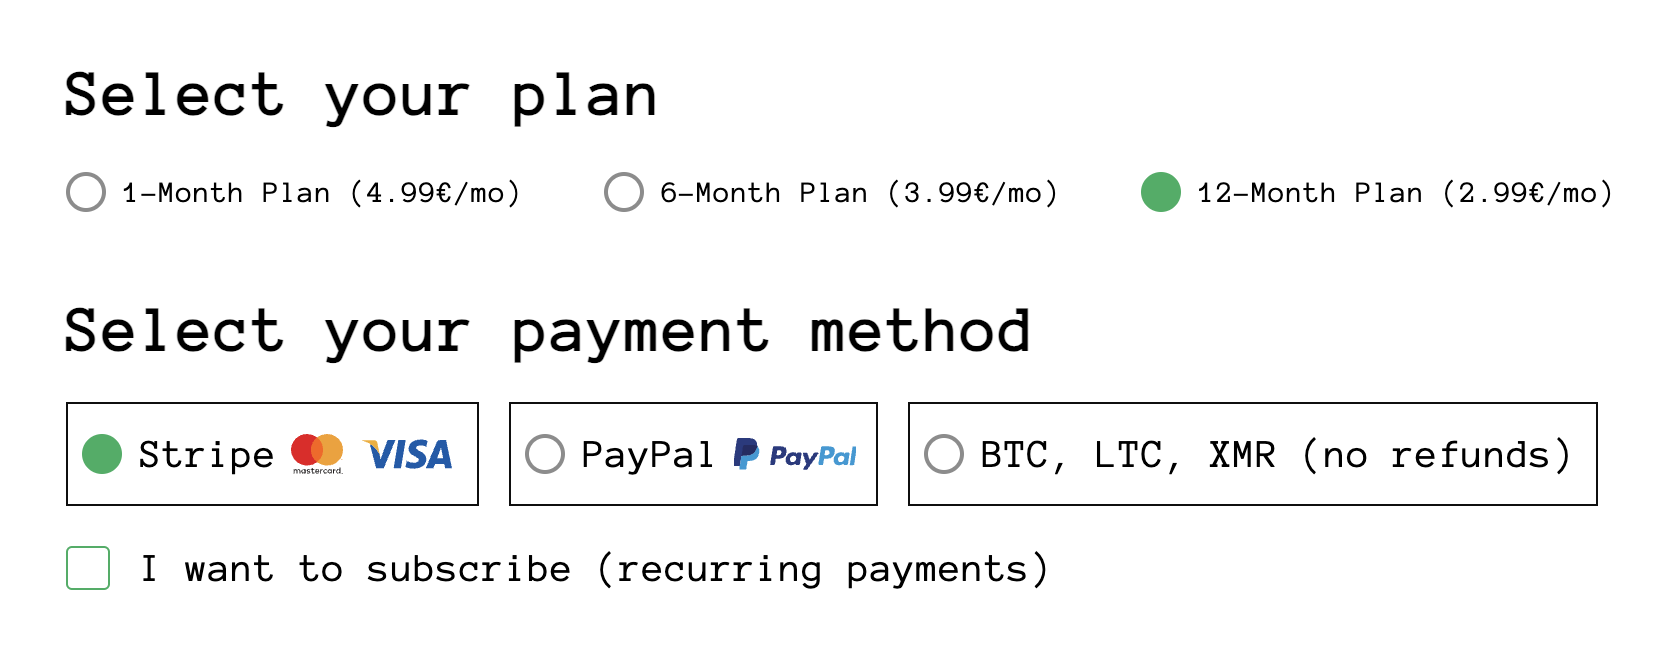
Не забудьте заполнить купон HABR2023 на скидку 10%:

При выборе Stripe или Paypal вы перейдёте на страницу оплаты этих сервисов, как при обычной оплате картой. Но для жителей России этот вариант не подходит, поэтому сразу перейдём к оплате криптой — один из самых простых способов оплачивать любые западные услуги (при условии, что они принимают крипту, конечно) из России.
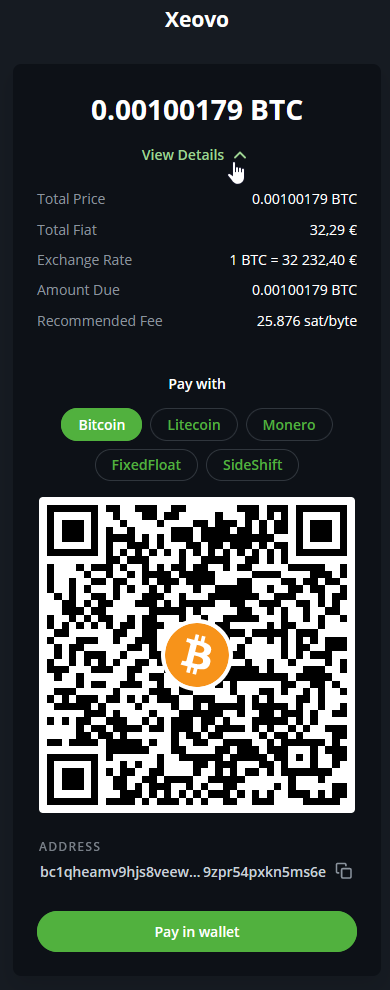
Разберём оплату Биткоином. Она всегда состоит из суммы в Биткоине и адреса Биткоин-кошелька вида bc1q………………36v. Для современных мобильных биткоин-кошельки адрес дублируется в виде QR-кода. А чтобы можно было вводить вручную, при нажатии на View details» открывается детальная информация для платежа:
Как оплатить
Есть два способа оплатить что-то криптой, если у вас её нет.
- Установить криптокошелёк, пополнить его через обменник и сделать оплату через него
- Сделать оплату напрямую через обменник (устанавливать ничего не требуется)
Первый способ — более традиционный, надёжный и психологически комфортный: вы видите сами, куда отправляете крипту и ход совершения транзакции (которая в случае Биткоина, например, может занимать от нескольких минут до нескольких часов). Но если вам нужна криптовалюта только чтобы оплатить VPN раз в год — можно сразу всё сделать через обменник.
Оплата напрямую с банковской карты через обменник
В этом случае вам понадобится только то средство платежа, которым вы уже пользуетесь — например, ваш банк (Сбер, Альфа, Тинькофф…) или электронные деньги. Через обменник средства можно отправить сразу для пополнения баланса Xeovo.
Для выбора обменника нужно зайти на сайт каталога обменников Bestchange, выбрать в левой колонке нужное средство оплаты и что вы хотите получить: Bitcoin, Litecoin, Monero… Вот, например, список обменников для пары Сбер-Биткоин:

Для оплаты VPN напрямую нужно смотреть обменники с соответствующей минимальной суммой платежа. Многие обменникы работают с платежами от 1000-3000₽, которых хватит на оплату подписки 6 или 12 месяцев, но можно найти обменники, которые работают с суммами от 300₽ — то есть, таким способом можно оплатить даже тариф на месяц. Кроме этого, при выборе главное смотреть на отзывы и рейтинг. Лучше выбирать обменники, которые не требуют верификации — для небольших сумм это обычно не нужно. С проблемами при переводе (за исключением ошибок ввода, например) мы в популярных обменниках не сталкивались. Самая частая возможная проблема — на стороне банка, которому не понравится перевод и вы не сможете отправить деньги.
При переходе на сайт обменника, сперва скопируйте сумму в BTC. Допустим, годовая подписка Xeovo VPN по текущему курсу Биткоина с купоном HABR2023 — 0.00100842 BTC. Смотрим на сайте обменника — это 3382₽ по сегодняшнему курсу.

На следующем шаге указываем адрес Биткоин-кошелька со страницы оплаты Xeovo и оплачиваем заявку через онлайн-банк или электронный кошелёк.
В этом случае обменник отправит биткоин непосредственно на ваш баланс Xeovo, пополнение произойдёт с учётом скорости прохождения транзакции (обычно 15-30 минут).
Оплата через кошелёк
Это основной способ оплаты криптой. Если вы планируете платить криптой за что-то ещё, хранить её для будущих расходов или в качестве инвестиций или просто не хотите переплачивать высокий курс за разовые минимальные транзакции в ~500-3000₽, то без кошелька для крипты не обойтись. Поэтому последняя часть инструкции — как выбрать кошелёк на примере Биткоина.
Какой Bitcoin-кошелёк использовать
На сайте Bitcoin.org есть русскоязычный FAQ «Всё о Биткоине», там же есть удобный сервис подбора Биткоин-кошелька по параметрам. Поскольку мы рассматриваем вариант быстро купить/потратить криптовалюту на небольшие суммы, то обращаем в первую очередь внимание на простоту установки и использования. Можно отсортировать по критериям для новичков (простота интерфейса) и полный контроль (разработчики приложения не могут заморозить или перевести вашу крипту).
Для Android советуют четыре популярных кошелька: классический Bitcoin Wallet, Bitpay, Electrum и Unstoppable. Bitpay — один из самых популярных и удобных кошельков с открытым исходным кодом, но непрозрачной процедурой обновлений. Тогда как Electrum — классический надёжный выбор для любого ПК (Mac, Windows, Linux) и Android с полной прозрачностью кода и обновлений.

Для iOS выбор по критериям «для новичков» и «полный контроль» ещё короче. К сожалению, «Электрума» для айфона нет, но есть Bitpay и Unstoppable. Их можно запускать также на последних версиях Mac.

Для десктопов (Windows, Mac, Linux) мы рекомендуем Wasabi (проще интерфейс) и Electrum (сложнее интерфейс).

Если вы уже пользуетесь или хотите поставить другой кошелёк, то проверить его безопасность можно на сайте WalletScrutiny, которые по собственной методологии проверяют кошельки для всех платформ — там есть все кошельки, про которые мы когда-либо слышали.
Оплата через кошелёк: расчёт комиссий
Если вы не занимаетесь майнингом криптовалют или не ожидаете получения крипты от кого-то ещё, то здесь описанный этап с обменниками тоже не обойти. Только в этом случае купленная крипта придёт на ваш кошелёк. Затем уже с него вы можете отправить её по адресу, который вам нужно оплатить, будь то Xeovo VPN или какой-то ещё сервис.
Каждая транзакция Биткоина включает в себя небольшую комиссию блокчейна, которую отправитель транзакции задаёт самостоятельно. Скорость прохождения транзакции в Биткоине зависит от загруженности сети и размера комиссии. Более высокая комиссия ускоряет транзакцию даже при высокой загруженности сети (иногда — за минуту-две, что очень быстро для Биткоина), при минимальной комиссии платеж может идти часами.
При оплате через обменники комиссию устанавливают они, обычно, чтобы платёж дошёл быстрее и клиент не паниковал — но это включено в курс обмена, удорожая операцию. При оплате с кошельков, пользователи могут «играть» с комиссией самостоятельно, но новые пользователи часто упускают эту возможность.
Пользователи, которые оплачивают Xeovo VPN криптой в первый раз часто совершают три ошибки:
- Не видят что есть View details в данных для платежа в личном кабинете, как на скриншоте выше, и не знают что можно оплатить вручную без QR-кода.
- Указывают слишком низкую комиссию для перевода, в итоге транзакция не проходит. Не все кошельки правильно выставляют автоматически комиссию (к кошелькам из нашего обзор это не относится). Есть отличный сайт Bitcoinfees который показывает какую комиссию нужно указывать и сколько времени займет подтверждение.
- Паникуют после оплаты, почему оплата не прошла (когда нет ещё ни одного подтверждения в блокчейне). Обычно это ~30 минут если выставили правильную комиссию. Нужно просто спокойно подождать 🙂
Текст: @EgorKotkin
Заглавная картинка: Антон Дмитриев

- Для оплаты зарубежными картами или криптовалютой: xeovo.com. Минус 10% по промокоду HABR2023
- Для оплаты рублями: VPNPay
Guides
1. Download and install Wireguard client from the official website.
2. Choose the preferred location and select generate a new key.
3. Now press the button to download .conf file or scan QR code.
4. Open WireGuard and add your key thought «Add Tunnel».
5. Select added key from left side and press «Activate».
6. Now you should be connected to Xeovo VPN.
Don’t connect to one key from multiple devices at the same time. The connection will be unstable and result in packet loss. Generate a key for every device that you will use.
1. Download and install WireGuard from App Store.
2. Choose the preferred location and select generate a new key.
3. Now press the button to download .conf file or scan QR code.
4. Press «Import tunnel(s) from file and select your key.
5. Allow WireGuard to add VPN configuration.
6. Activate selected key. Now you should be connected to Xeovo VPN.
Don’t connect to one key from multiple devices at the same time. The connection will be unstable and result in packet loss. Generate a key for every device that you will use.
1. Use terminal/console to install WireGuard.
sudo apt update && sudo apt install openresolv wireguard2. Choose the preferred location and select generate a new key.
3. Download configuration file and copy/move it to /etc/wireguard.
4. Set correct permissions
sudo chown root:root -R /etc/wireguard && sudo chmod 600 -R /etc/wireguard4. Turn on WireGuard. For example we will use xeovo-lv.
wg-quick up xeovo-lv5. Turn off WireGuard.
wg-quick down xeovo-lv6. Start WireGuard automatically on boot (optional)
systemctl enable wg-quick@xeovo-lvDon’t connect to one key from multiple devices at the same time. The connection will be unstable and result in packet loss. Generate a key for every device that you will use.
1. Download WireGuard for Android from Google Play or F-Droid.
2. Choose the preferred location and select generate a new key.
3. Now press the button to download .conf file or scan QR code.
4. Press plus button and choose «Create from file or archive», or «Create from QR code».
5. Now key will appear in WireGuard app and you can connect to our secure servers.
Don’t connect to one key from multiple devices at the same time. The connection will be unstable and result in packet loss. Generate a key for every device that you will use.
1. Download WireGuard for iOS from App Store.
2. Choose the preferred location and select generate a new key.
3. Now press the button to download .conf file or scan QR code.
4. Press plus button and choose «Create from file or archive», or «Create from QR code».
5. Now key will appear in WireGuard app and you can connect to our secure servers.
Don’t connect to one key from multiple devices at the same time. The connection will be unstable and result in packet loss. Generate a key for every device that you will use.
1. Download OpenVPN for Windows on OpenVPN.net (you need the Windows Installer) and install OpenVPN.
2. In your account, download the config file (.ovpn) you want to use, and copy it to C:\Program Files\OpenVPN\config\. If you downloaded multiple config files as an archive, extract it in that folder.
3. Start OpenVPN GUI as Administrator. You can find it on your desktop or in the start menu. Once it’s started, you should see it in the system tray. Right click it and select Connect.
4. Your login & password are the same as on our website.
5. It should now open an OpenVPN log window showing its progress. If an error occurred or you have another question, contact our support.
6. If everything worked, the OpenVPN icon should turn green. Your are now connected and can enjoy your secure connection.
1. Download the .ovpn file you need in your account.
2. Download and install TunnelBlick.
3. Import the provided .ovpn OpenVPN configuration in TunnelBlick.
4. The VPN is now ready to use within TunnelBlick.
With NetworkManager
WARNING: This method requires a very recent NetworkManager. Older versions will not work or may be insecure.
It has not been tested as much as the classic one and may not work on your system. It is known to work with an up to date Arch Linux and Linux Mint 17 or later.
If you are not sure about it, choose the other methods.
1. Download and install OpenVPN and the NetworkManager plugin with your package manager.
sudo apt-get install openvpn resolvconf network-manager-openvpn network-manager-openvpn-gnomesudo yum install openvpn networkmanager-openvpnsudo pacman -S openvpn networkmanager-openvpn2. Download the .ovpn file you need in your account and put it in /etc/openvpn/.
ie: /etc/openvpn/xeovo.conf
3. Download the ca.crt file and put it in /etc/openvpn/ aswell.
4. Create the NetworkManager profile:
- Create a new OpenVPN connection. This highly depends on your environment:
- Mint: Left click on the Network icon in the Control Panel> Network Connections> Add
5. Your VPN is now ready to use with NetworkManager.
With systemd (Arch, Fedora 16 or later, Debian 8 or later, . )
1. Download and install OpenVPN with your package manager.
sudo apt-get install openvpnsudo yum install openvpnsudo pacman -S openvpn2. Download the .ovpn file you need in your account and put it in /etc/openvpn/.
ie: /etc/openvpn/xeovo.conf3. Start the OpenVPN service: sudo systemctl start openvpn@xeovo
4. (Optional) To make OpenVPN start at boot, create a text file anywhere and write your username and password inside, on two lines.
Then, add at the end of your xeovo.conf file: auth-user-pass /path/to/the/file.txt
And enable the systemd service: systemctl enable openvpn@xeovo
For additional security, you can make sure only root is be able to access this file:
sudo chown root:root /path/to/the/file.txt
sudo chmod 600 /path/to/the/file.txtWithout systemd (Debian before 8.0, . )
1. Download and install OpenVPN with your package manager.
sudo apt-get install openvpn resolvconfsudo yum install openvpn2. Download the .ovpn file you need in your account and put it in /etc/openvpn/.
ie: /etc/openvpn/xeovo.conf3. Start the OpenVPN service: sudo service openvpn start xeovo
4. (Optional) To make OpenVPN start at boot, create a text file anywhere and write your username and password inside, on two lines.
Then, add at the end of your xeovo.conf file: auth-user-pass /path/to/the/file.txt
And enable the systemd service: systemctl enable openvpn@xeovo
And add the configuration file name to the AUTOSTART list in /etc/default/openvpn (you can add it at the end): AUTOSTART=»xeovo»
For additional security, you can make sure only root is be able to access this file:
sudo chown root:root /path/to/the/file.txt
sudo chmod 600 /path/to/the/file.txt1. Install Arne Schwabe’s OpenVPN for Android. It is the most frequently updated and secure OpenVPN client for Android.
2. Download the .ovpn file you need in your account and save it somewhere on your Android device.
3. Open the OpenVPN for Android application and import the .ovpn file. It will create a new profile from the configuration file.
4. Your login & password are the same as on our website.
(Optionally) Edit the imported profile and set your username and password if you do not want to be asked every time.
You can now connect to that profile. On connection it will show the log while trying to connect. If it fails to connect, you can use the menu here to send the log by email to support at xeovo.com or copy it in a support ticket.
1. Go to the App store with your iPad/iPhone and download Openvpn Connect.
2. After the successful installation, download .ovpn configuration file.
3. Select Open in OpenVPN.
4. Tap on the green plus button.
5. Enter your Xeovo credentials and mark the password to be saved in keychain.
6. Tap on the button to connect to VPN. You have successfully connected.
Important notes
The main goal of stealth proxies is to bypass DPI. Please note that the stability and speeds might not be the same as on our VPN servers. Available locations are not permanent and might be removed/replaced anytime. This usually happens, because our IP ranges get blocked.
We don’t recommend using stealth proxies, if you can use WireGuard or OpenVPN. Please be aware that none of the protocols or clients we mention have undergone thorough security auditing.
Notice that some of the clients or software might use 3rd party DNS by default.
Which location to use?If you are connecting from outside China, you can use all proxy locations except for South Korea and Japan.
Which protocol to use?
For users connecting from China or Iran, we recommend using VLESS as the first choice and Trojan/VMess as the second choice.
If you are connecting from any other country, Shadowsocks is generally sufficient to bypass DPI.
Installing v2rayN
1. Download and install the latest v2rayN (v2rayN-Core.zip) client from GitHub.
2. Open proxy generator and generate a new key. You don’t need more than one.
3. Now you can get subscription URL. Click to copy.
4. Open v2rayN. If your language is set to Chinese, click «3 dots» and select English. Reboot the client.
5. Click «Subscription group», select «Subscription group Settings» and press «Add».
6. Write any name in «Remarks» and paste our URL in «URL(Optional)» field and press «Confirm».
7. Click again on «Subscription group» and select «Update subscription without proxy».
8. Select preferrable location and protocol in the list and press enter.
9. To establish connection change «System proxy» from «Clear system proxy» to «Set system proxy».
10. Now you should be connected to the server.
Alternative clients
In case you have problems with v2rayN or want to try other clients for Windows you can try NekoRay, Furious or Netch.
Important notes
The main goal of stealth proxies is to bypass DPI. Please note that the stability and speeds might not be the same as on our VPN servers. Available locations are not permanent and might be removed/replaced anytime. This usually happens, because our IP ranges get blocked.
We don’t recommend using stealth proxies, if you can use WireGuard or OpenVPN. Please be aware that none of the protocols or clients we mention have undergone thorough security auditing.
Notice that some of the clients or software might use 3rd party DNS by default.
Which location to use?If you are connecting from outside China, you can use all proxy locations except for South Korea and Japan.
Which protocol to use?
For users connecting from China or Iran, we recommend using VLESS as the first choice and Trojan/VMess as the second choice.
If you are connecting from any other country, Shadowsocks is generally sufficient to bypass DPI.
Installing NekoRay
1. Install Nekoray from GitHub. If you have an Intel-based Mac, download nekoray_amd64.zip. If you have an M1/M2, download nekoray_arm64.zip.
2. Open proxy generator and generate a new key. You don’t need more than one.
3. Now you can get subscription URL. Click to copy.
4. Open NekoRay and click on «Preferences» — «Groups».
5. Click «New group», enter any name in the «Name» field, and from the dropdown menu, select «Subscription» as the type. Paste the URL you obtained from the generator, and then click «OK».
6. Now, click «Update all subscriptions». If the update fails due to an SSL error, navigate to «Preferences — Basic settings — Subscriptions» and enable «Ignore TLS errors when updating subscriptions». Afterward, attempt the update again.
7. Click on prefered location/protocol, and hit enter. After that select «System proxy» to establish connection.
8. Now you should be connected to the server.
Alternative clients
In case you have problems with NekoRay or want to try other clients for Windows you can try Shadowrocket or sing-box.
Important notes
The main goal of stealth proxies is to bypass DPI. Please note that the stability and speeds might not be the same as on our VPN servers. Available locations are not permanent and might be removed/replaced anytime. This usually happens, because our IP ranges get blocked.
We don’t recommend using stealth proxies, if you can use WireGuard or OpenVPN. Please be aware that none of the protocols or clients we mention have undergone thorough security auditing.
Notice that some of the clients or software might use 3rd party DNS by default.
Which location to use?If you are connecting from outside China, you can use all proxy locations except for South Korea and Japan.
Which protocol to use?
For users connecting from China or Iran, we recommend using VLESS as the first choice and Trojan/VMess as the second choice.
If you are connecting from any other country, Shadowsocks is generally sufficient to bypass DPI.
Installing NekoRay
1. Download and install Nekoray Appimage from GitHub.
2. During the initial setup, choose the «sing-box» core.
3. Open proxy generator and generate a new key. You don’t need more than one.
4. Now you can get subscription URL. Click to copy.
5. Open NekoRay and click on «Preferences» — «Groups».
6. Click «New group», enter any name in the «Name» field, and from the dropdown menu, select «Subscription» as the type. Paste the URL you obtained from the generator, and then click «OK».
7. Now, click «Update all subscriptions». If the update fails due to an SSL error, navigate to «Preferences — Basic settings — Subscriptions» and enable «Ignore TLS errors when updating subscriptions». Afterward, attempt the update again.
8. Click on prefered location/protocol, and hit enter. After that select «System proxy» to establish connection.
9. Now you should be connected to the server.
Alternative clients
In case you have problems with NekoRay or want to try other clients for Linux you can try v2rayA.
Important notes
The main goal of stealth proxies is to bypass DPI. Please note that the stability and speeds might not be the same as on our VPN servers. Available locations are not permanent and might be removed/replaced anytime. This usually happens, because our IP ranges get blocked.
We don’t recommend using stealth proxies, if you can use WireGuard or OpenVPN. Please be aware that none of the protocols or clients we mention have undergone thorough security auditing.
Notice that some of the clients or software might use 3rd party DNS by default.
Which location to use?If you are connecting from outside China, you can use all proxy locations except for South Korea and Japan.
Which protocol to use?
For users connecting from China or Iran, we recommend using VLESS as the first choice and Trojan/VMess as the second choice.
If you are connecting from any other country, Shadowsocks is generally sufficient to bypass DPI.
Installing v2rayNG
1. Install v2rayNG client for Android from Google Play.
2. Open proxy generator and generate a new key. You don’t need more than one.
3. Now you can get subscription URL. Click to copy.
4. Open v2rayNG and tap on the menu on the left side.
5. Tap on «Subscription group setting» and tap on «+» to add subscription.
6. Write any name in «Remarks» and paste our URL in «Optional URL» field and tap save.
7. Go back to main screen and tap on 3 dots in the right corner and choose «Update subscription».
8. Now you should see list with all available servers and protocols.
9. Select added configuration file and press «V» icon to establish the connection.
10. Now you should be connected to the server.
Alternative clients
In case you have problems with v2rayNG or want to try other clients for Android you can try SagerNet or Clash.
Important notes
The main goal of stealth proxies is to bypass DPI. Please note that the stability and speeds might not be the same as on our VPN servers. Available locations are not permanent and might be removed/replaced anytime. This usually happens, because our IP ranges get blocked.
We don’t recommend using stealth proxies, if you can use WireGuard or OpenVPN. Please be aware that none of the protocols or clients we mention have undergone thorough security auditing.
Notice that some of the clients or software might use 3rd party DNS by default.
Which location to use?If you are connecting from outside China, you can use all proxy locations except for South Korea and Japan.
Which protocol to use?
For users connecting from China or Iran, we recommend using VLESS as the first choice and Trojan/VMess as the second choice.
If you are connecting from any other country, Shadowsocks is generally sufficient to bypass DPI.
Installing FoXray
1. Install FoXray client from App Store.
2. Open proxy generator and generate a new key. You don’t need more than one.
3. Now you can get subscription URL. Click to copy.
4. Open FoXray and tap on «Subscriptions», then tap the «+» icon in the upper right corner.
5. You can type any name in ‘Name’ field. Paste provided URL from generator to «URL» field and tap «Add».
6. Return to the «FoXray» tab. You should now see a list of all servers and protocols.
7. To connect to a specific server/protocol, tap the ‘Play’ icon and grant FoXray permission to add VPN configurations.
8. Now you should be connected to the server.
Installing Shadowrocket
1. Install Shadowrocket client from App Store.
2. Open proxy generator and generate a new key. You don’t need more than one.
3. Now click «Switch protocol» dropdown menu and select «Shadowrocket». Copy URL.
4. Open Shadowrocket and tap on «Config», then tap the «+» icon in the upper right corner.
5. Paste provided URL from generator to «URL» field and tap «Download».
6. Return to the «Home» tab. You should now see a list of all servers and protocols.
7. To connect to a specific server/protocol, tap preffered location and change «Global routing» from «Config» to «Proxy».
8. Now toggle «Not connected» button to enable proxy and grant Shadowrocket permission to add VPN configurations.
9. Now you should be connected to the server.
Alternative clients
In case you have problems with FoXray or don’t want to purchase Shadowrocket you can try other clients for iOS. For example sing-box, Fair or V2Box.
Обзор Xeovo VPN
Xeovo — это самофинансируемая VPN-компания, базирующаяся в Финляндии. Работает с 2016 года. Активно разрабатывается и помогает людям обходить блокировки в странах с жесткой цензурой.
Рейтинг VPN сервиса очень низкий. Мы не рекомендуем использовать это решение, так как ваши данные могут попасть в ненужные руки.
- Параметры
- Цена
- Платформы
- Страны
- Методы оплаты
- Отзывы
Особенности сервиса
- Раздельное туннелирование (позволяет направлять через VPN определенное приложение. Доступно только на Android);
- Stealth proxies (поддерживает нестандартные протоколы, которые очень трудно заблокировать).
- Платформы и ОС
- Логирование Отсутствует
- Аудит безопасности Нет
- Принимает карты банков РФ Нет
- Доступно из России Да
- Скорость соединения Превосходно
- Криптовалюта Есть
- Сбор данных пользователя Нет
- Протоколы
WireGuard OpenVPN Shadowsocks Trojan VMESS VLESS
Цена
Есть 3 тарифа — на 1 Месяц, на 6 Месяцев и на Год.
Платформы и ОС
У сервиса нет своего приложения, поэтому вам придется воспользоваться сторонними приложениями, например: WireGuard или Outline (для использования Shadowsocks).
Страны
Великобритания
Люксембург
НидерландыРабота сервиса ограничена самым малым числом стран среди конкурентов в нашем рейтинге.
Методы оплаты
Credit Card Bitcoin Monero PayPal
Сервис не поддерживает оплату картами Российских банков, но разработчики собрали список сервисов через которые у вас есть возможность оплатить услуги VPN.
Логирование
Отсутствует
Регистрация доступна без указывания почты или чего-либо еще.
Торренты
Сервис заявляет, что поддерживает торренты, но не на всех локациях.
Маскировка трафика
Сервис имеет множество протоколов, которые поддерживают маскировку трафика.
Отзывы о Xeovo VPN
Sorutora 05 сентября 2022
Отрицательныйневыносимо сложно удалить, прога лезет прямо в корень системы
Работяга 09 августа 2022
ПоложительныйОчень долго не могли с друзьями программу для создания нормальной локальной сети, но для XeovoVPN это плёвое дело. Приложуха улёт!
TUPiks тупиков 10 июня 2022
Отрицательныйустонавливаю Xeovo у меня пишит более новая версия устоновлена, я переустонавливаю и такая же фигня
Ilyabezrukov31 06 июня 2022
Положительный3 звезды из-за того что когда ты захочешь удалить , программа так и будет в системе и надо помучится для её выключения
Ирина Ж. 05 февраля 2022
ОтрицательныйНе качайте это майнер . А отзывы накручены , еле удалил
Константин Бакулен 09 января 2022
ПоложительныйКлассная Программа для игр, удобная легкая, нет трудностей с регистрации потому что ее нету, создаёшь сеть и приглашай кого угодно :3